
Manometer to test LPG pressure
Parts needed:
Approx. 60″ of clear 3/8″ flexible plastic (vinyl) tubing.
Staples or tie straps to hold tubing to back plate.
6″ x 16″ wood board or sheet metal.
Ruler.
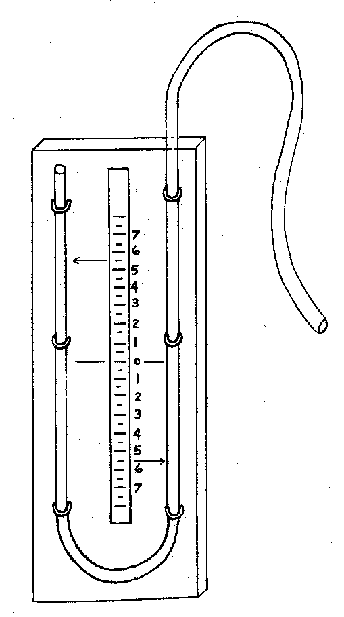
1.) Attach the plastic tubing to the back board using staples or tie straps in a “U” shape 12″ to 14″ in both directions as per the below drawing.
2.) At about the midway point of the tubing, mark the back board with a zero location.
3.) From the zero location, place marks every 1/2″ above and below. Number the marks every one inch. Place a target arrow mark at 5 1/2″ on top and bottom. This target will equal 11 inches of water column.
To Test Gas Pressure
- Fill the Manometer “U” tubing with water until both sides reach zero.
- Connect free end of tubing to the gas supply line. A slip fit or hand held fit should be sufficient. Be sure it does not leak.
- Hold the Manometer vertical and slowly turn the gas supply on.
- The pressure will push the water down the input side and up the output side. The combined sum of both distances is the “inches of water column pressure”. The target is 5 1/2″ + 5 1/2″ = 11 inches of W.C.
- Most high quality regulators will have an adjustment screw usually covered with a plug or plastic screw cap. Turn the adjuster screw slightly and repeat steps 3 & 4 until 11″ W.C. is achieved.